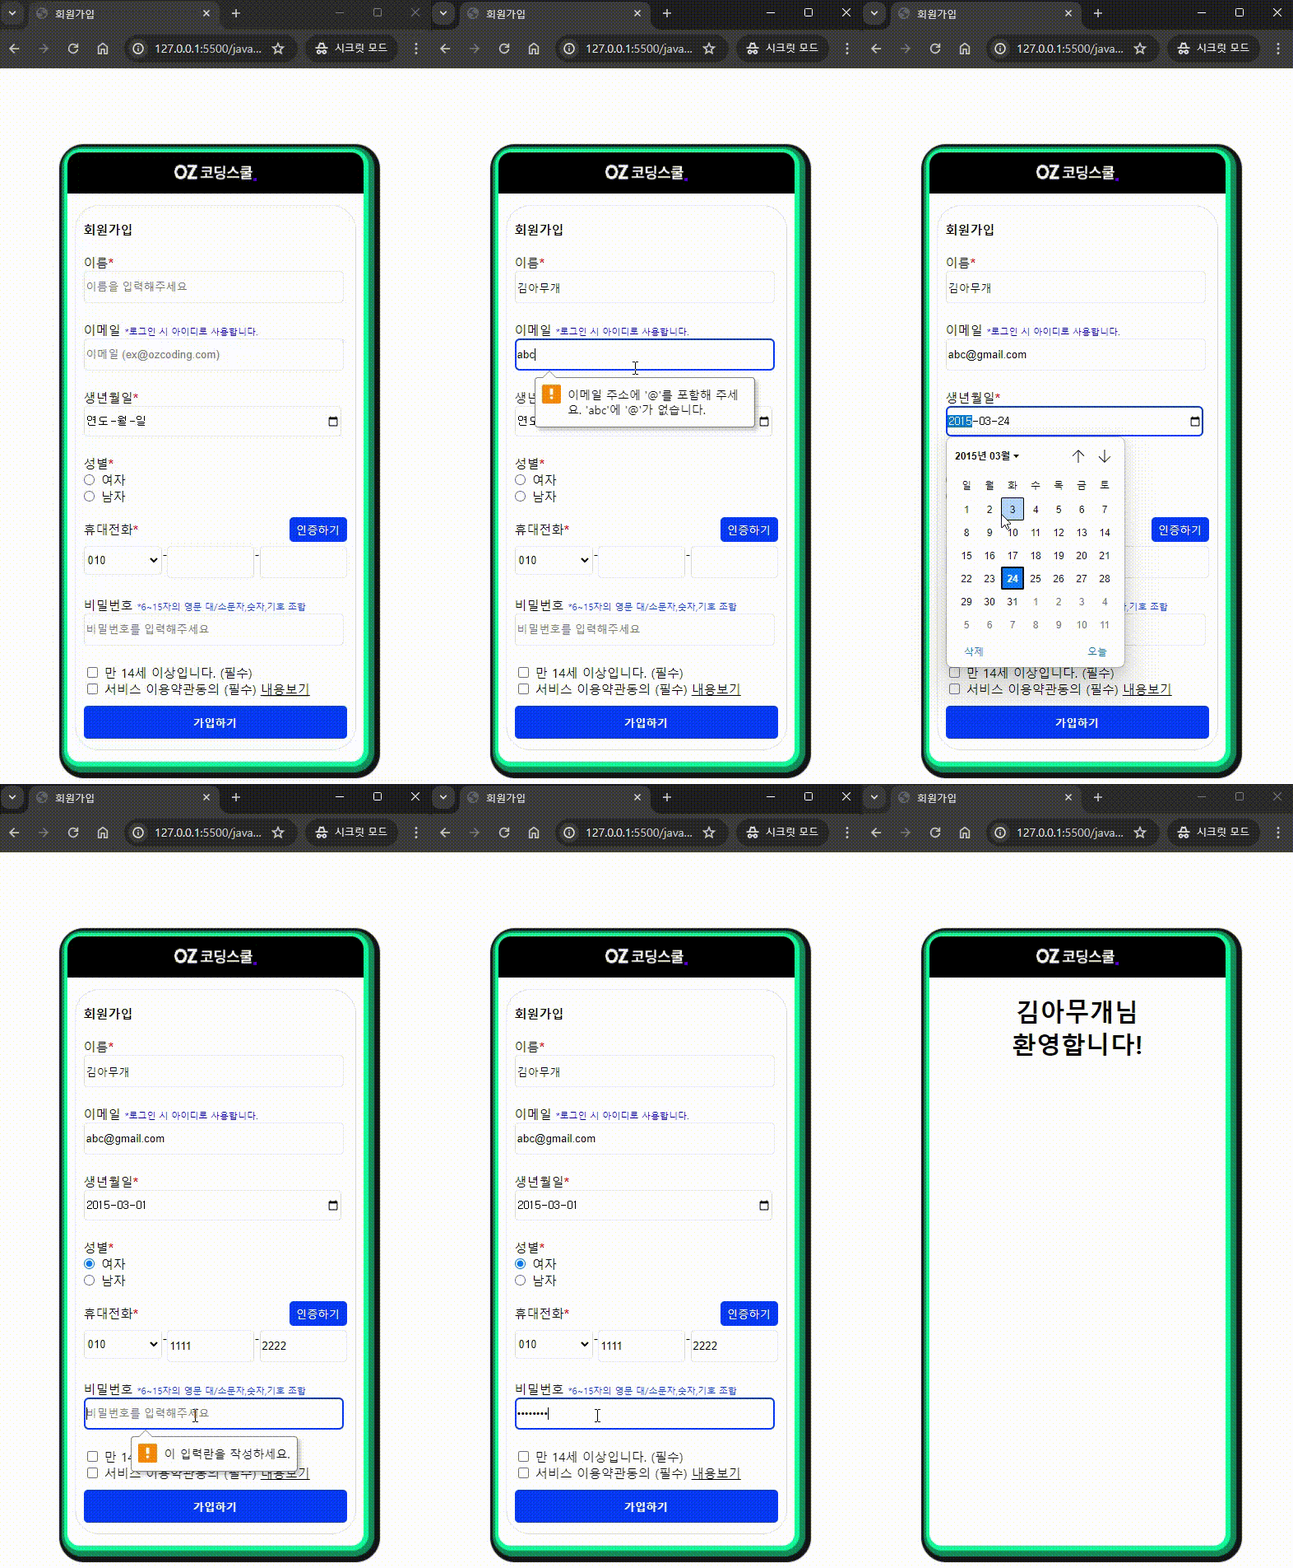
실행 결과 미리 보기

Today's
목표
1. 회원가입 완료시 유저에게 보여줄 환영인사 메시지 구현하기
2. input 요소에 입력된 value를 다루기
추가 목표
1. 모든 항목은 필수 입력 항목이어야 한다
2. submit 이벤트가 발생했을 때 새로고침이 일어나지 않아야 한다
코드리뷰
01. Main
<body>
  <div class="container">
    <header class="logo">
      <img src="images/ozcoding_logo.png" alt="logo">
    </header>

    <form class="form-input">
      <h4 class="form-title">회원가입</h4>

      <div class="input-name">
        <label for="name">이름<b style="color: red;">*</b></label>
        <input type="text" id="name" name="name" placeholder="이름을 입력해주세요" required maxlength="15">
      </div>

      <div class="input-email">
        <label for="email">이메일
          <span style="color: blue; font-size: 11px;">*로그인 시 아이디로 사용합니다.</span>
        </label>
        <input type="email" id="email" name="email" required placeholder="이메일 (ex@ozcoding.com)">
      </div>

      <div class="input-birth">
        <label for="birth">생년월일<b style="color: red;">*</b></label>
        <input type="date" id="birth" name="birth" required >
      </div>

      <div class="input-sex">
        <div>성별<b style="color: red;">*</b></div>
        <ul class="sex-list">
          <li class="sex-woman">
            <input type="radio" id="woman" name="gender" >
            <label for="woman">여자</label>
          </li>
          <li class="sex-man">
            <input type="radio" id="man" name="gender" >
            <label for="man">남자</label>
          </li>
        </ul>
      </div>

      <div class="input-tel">
        <div class="tel-nav">
          <div class="tel-text">휴대전화<b style="color: red;">*</b></div>
          <button class="tel-verification">인증하기</button>
        </div>
        <div class="tel-info">
          <select id="tel-fir" name="phone">
            <option value="010" selected>010</option>
            <option value="011">011</option>
            <option value="016">016</option>
            <option value="017">017</option>
          </select>
          <span class="tel-text">-</span>
          <input type="text" name="phone" minlength="4" maxlength="4">
          <span class="tel-text">-</span>
          <input type="text" name="phone" minlength="4" maxlength="4">
        </div>
      </div>

      <div class="input-password">
        <label for="password">비밀번호
          <span style="color: #0040FF; font-size: 11px;">*6~15자의 영문 대/소문자,숫자,기호 조합</span>
        </label>
        <input type="password" id="password" name="password" placeholder="비밀번호를 입력해주세요" required minlength="6" maxlength="15">
      </div>

      <div class="input-check">
        <div class="checkbox">
          <input type="checkbox" class="input-checkbox" id="check-age" name="checkbox01" required>
          <label for="check-age">만 14세 이상입니다. (필수)</label>
        </div>
        <div class="checkbox">
          <input type="checkbox" class="input-checkbox" id="check-service" name="checkbox02" required>
          <label for="check-service">서비스 이용약관동의 (필수)</label>
          <span><u>내용보기</u></span>
        </div>
      </div>

      <button class="submit-btn" type="submit">가입하기</button>

    </form>

    <script src="script.js"></script>
  </div>
</body>- input 요소중 회원가입에 필요한 type
text / email / birth / radio / password / checkbox
= input에 required 요소를 넣으면 HTML자체에서 필수입력으로 인식해서 걸러준다
html, body{
  height: 100%;
  margin: 0;
  box-sizing: border-box;
}

/* 회원가입 form 제출시 기존 form 숨기기 className */
.hidden{
  display: none;
}

body{
  font-size: 15px;
  display: flex;
  justify-content: center;
  align-items: center;
}
.logo{
  height: 50px;
  margin: 0px;
  background-color: #000000;
  border-radius: 15px 15px 0px 0px;

  text-align: center;
  line-height: 60px;
}
.logo > img{
  width: 100px;
  height: auto;
}
.container{
  width: 360px;
  height: 740px;
  background-color: #FFFFFF;
  border-radius: 15px;
  box-shadow: 1px 1px 1px 5px #00E09A ,3px 3px 1px 10px #0A7E58, 5px 5px 1px 15px #141517;
  position: relative;
}
.form-input{
  width: 320px;
  height: 660px;
  padding-left: 10px;
  padding-right: 10px;

  border-radius: 30px;
  border: solid 0.05em #dfe4ea;

  position: absolute;
  left: 9px;
  bottom: 14px;
}

input[type=text], input[type=email], input[type=date], input[type=password] {
  width: 310px;
  height: 35px;
  border: solid 0.05em #dfe4ea;
  border-radius: 5px;
}
/* 핸드폰 input box */
select, .tel-info > input[type=text]{
  width: 100px;
  height: 35px;
  border: solid 0.05em #dfe4ea;
  border-radius: 5px;
}
.tel-nav{
  display: flex;
  justify-content: space-between;
  align-items: center;

  margin-bottom: 5px;
}
.tel-info{
  display: flex;
}
.input-name{
  margin-bottom: 20px;
  display: flex;
  flex-direction: column;
}
.input-email{
  margin-bottom: 20px;
  display: flex;
  flex-direction: column;
}
.input-birth{
  margin-bottom: 20px;
  display: flex;
  flex-direction: column;
}
.input-sex{
  margin-bottom: 20px;
  display: flex;
  flex-direction: column;

  position: relative;
}
.input-tel{
  margin-bottom: 20px;
  display: flex;
  flex-direction: column;
}
.input-password{
  margin-bottom: 20px;
  display: flex;
  flex-direction: column;
}
input, select{
  margin-bottom: 3px;
}
input:focus{
  outline-color: #0040FF;
}

.tel-verification{
  cursor: pointer;

  width: 70px;
  height: 30px;
  color: #FFFFFF;
  background-color: #0040FF;
  border: none 0.05em #dfe4ea;
  border-radius: 5px;
}
.tel-verification:hover{
  background-color: #3064ff;
}

ul{
  list-style-type:none;
}
.sex-list{
  display: flex;
  flex-direction: column;
  margin: 0px 0px -5px -45px;
}

.checkbox > span > u{
  cursor: pointer;
}
u:hover{
  color: #0040FF;
}

.submit-btn{
  cursor: pointer;

  width: 320px;
  height: 40px;
  font-weight: 900;
  margin-top: 10px;

  border: none 0.05em #dfe4ea;
  border-radius: 5px;
  background-color: #0040FF;
  color: #FFFFFF;
}
.submit-btn:hover{
  background-color: #3064ff;
}- form에 class='hidden' 을 추가해서 form이 제출되면 회원가입 form이 안보이게하기
const form = document.querySelector('.form-input');
const container = document.querySelector('.container');

const HIDDEN_CLASSNAME = 'hidden'; //자주쓰는 className String으로 저장해둠

let greeting = document.createElement('h1');
greeting.classList.add(HIDDEN_CLASSNAME);
greeting.style.textAlign='center';

//핸드폰 인증버튼 구현X 안내 alert
const telVerification = document.querySelector('.tel-verification');
telVerification.addEventListener('click',function(){
  alert('아직 구현되지 않은 버튼입니다.')
})

form.addEventListener('submit', function(e){
  e.preventDefault(); //새로고침 방지

  //바뀌는 값이긴한데 submit할때마다 변수가 새로 계속 생성되서 const 사용해도 괜찮다
  let userName = e.target.name.value;
  let userEmail = e.target.email.value;
  let userBirth = e.target.birth.value;
  let userGender = e.target.gender.value;
  let userPhone = e.target.phone.value;
  let userPassword = e.target.password.value;

  form.classList.add(HIDDEN_CLASSNAME);

  greeting.innerText = `${userName}님\n 환영합니다!`;
  container.appendChild(greeting);
  greeting.classList.remove(HIDDEN_CLASSNAME);
  console.log(greeting);
})

// 패스워드 형식 체크
// 이메일 형식 체크
// checkbox값 각각 다 들고와서 True/False &&연산자로 확인후 alert창띄우기- 자주 사용하는 상수는 변수로 만들어 놓기
const HIDDEN_CLASSNAME = 'hidden';
처럼 변수명은 대문자로만 입력하기 - Form은 제출되면 새로고침이 자동으로 진행된다
e.preventDefault(); 으로 새로고침방지 - 회원가입에서 input으로 얻어지는 값들은 const로 선언해도 된다
= 바뀌는 값이긴한데 submit할때마다 변수가 새로 계속 생성되서 const 로 변수선언해도 괜찮다
마무리
보완해야 할 점
1. HTML 에서 Password의 조건을 *6~15자의 영문 대/소문자,숫자,기호 조합 으로 안내했지만 코드내부에서
해당 조건을 확인하는 코드가 없다 (필요함)
추후 공부 할 내용
1. 핸드폰 인증은 보통 휴대폰 본인인증 api 를 들고와서 연결한다
'DEVELOPMENT > JavaScript' 카테고리의 다른 글
| [JS] 실습예제 (5) | 2024.04.26 |
|---|---|
| [JS] 데이터 타입 (2) | 2024.04.24 |
| [JS] 변수 (0) | 2024.04.24 |
| [JS] 크리스마스 카운트다운 (4) | 2024.04.24 |
| [JS] 몬스터 잡기 게임 (4) | 2024.04.23 |

